While using the keyboard shortcut to change the sound volume in Windows 11 might be the most common way, what would happen if the volume key is unavailable on your new device’s keyboard? Well, that is where these six ways to access volume control options and change volume levels on Windows 11 come to the rescue. Let’s begin.
1. Adjust Volume Settings Using the Mouse Wheel
One of the quickest ways to change the sound volume in Windows 11 is by using the mouse wheel. To do this, hover your cursor over the sound icon in the taskbar. Then, simultaneously move the mouse wheel up or down to increase or decrease the volume levels. As you do so, you will be able to see the volume levels go up or down. However, ensure your device is connected to an external mouse as this feature will not work when using your device’s trackpad.
2. Use the Keyboard Shortcut
Most PCs now come with dedicated buttons for volume control. These buttons might appear separately or as a part of the F (Function) keys. If they’re a part of the F keys for you, you might need to simultaneously press the Fn and the volume key to increase or decrease system sound. While doing so, volume controls might also appear on your screen, giving you an indication of the current volume levels. If this feature is not available, move on to the next method.
3. Using the Quick Settings Panel
The Quick Settings menu can be called a mini version of the Settings menu. Here you will find basic system controls like Wi-Fi, Bluetooth, and even Cast settings. So, it comes as no surprise that you can also use Quick Settings to change the volume levels in Windows 11. Here’s how to do it. Step 1: In the bottom right, click on the network, sound, or battery icon. Tip: You can also use the Windows + A key to open Quick Settings. Step 2: Then, use the volume slider to adjust the Windows volume. After the changes are made, click anywhere outside of the Quick Settings panel to close it.
4. Change Volume Using Settings Menu
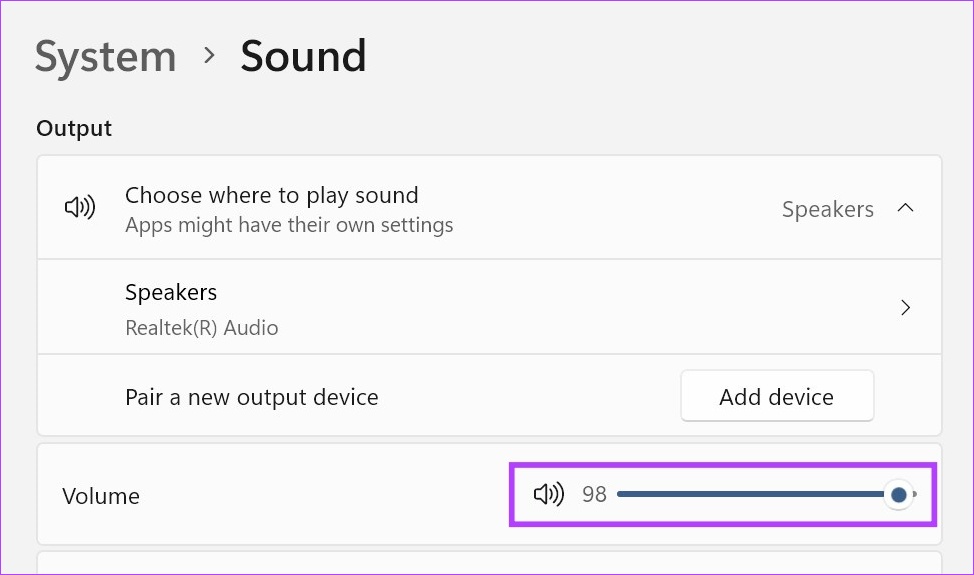
Just like its name suggests, the Settings menu is the home to all major and minor settings in Windows 11. This also means that you can use the volume control options here to change the volume levels in Windows 11. Here’s how. Step 1: Use the Windows + I key on your keyboard to open Settings. Step 2: From the menu options, click on System. Step 3: Here, click on Sound. Step 4: Now, use the volume slider to adjust the device volume. If you want, you can also access the Windows Volume Mixer to adjust the volume levels for individual apps. Here’s how. Step 5: Scroll down and click on Volume mixer. Now use the individual volume sliders to adjust the volume for the currently active apps.
5. Using Control Panel
You can also use the Control Panel to access Windows Volume Mixer. Then, use it to adjust the volume for individual Windows apps. Follow the below steps to do it. Step 1: Click on Search and type Control Panel. Then, open Control Panel. Step 2: Here, click on ‘Hardware and Sound’. Step 3: Then, go to the Sound option and click on ‘Adjust system volume’. This will open separate volume sliders for all the currently active apps using Windows sound. Use the sliders to adjust the volume accordingly. Tip: Check how to fix if volume automatically goes up or down in Windows.
6. Using Xbox Game Bar Shortcut
The Xbox Game Bar comes in handy when playing games as it allows you to quickly check and adjust certain system settings like resources, current system performance, sound, etc. This means it can also be used to change the volume levels in Windows 11. Let’s have a step-by-step look at how to do it. Step 1: Use the Windows + G keyboard shortcut to open Xbox Game Bar. Step 2: Here, click on the speakers icon. This will open volume control options. Step 3: In the new window, select the Mix tab and use the slider under ‘Windows Default Output’ to adjust the volume levels. Step 4: Additionally, click on the down arrow to open other volume options. Step 5: Then, use the individual sliders to adjust volume levels. Once done, either use the Windows + G keyboard shortcut again or click anywhere outside the panel to close the Xbox Game Bar.
Adjust Volume Levels
So these were all the ways you could use to adjust volume levels in Windows 11. But if you’re unable to hear sounds, there might be an issue with your device’s volume settings. In this case, check out our guide on fixing sound not working on Windows 11. The above article may contain affiliate links which help support Guiding Tech. However, it does not affect our editorial integrity. The content remains unbiased and authentic.