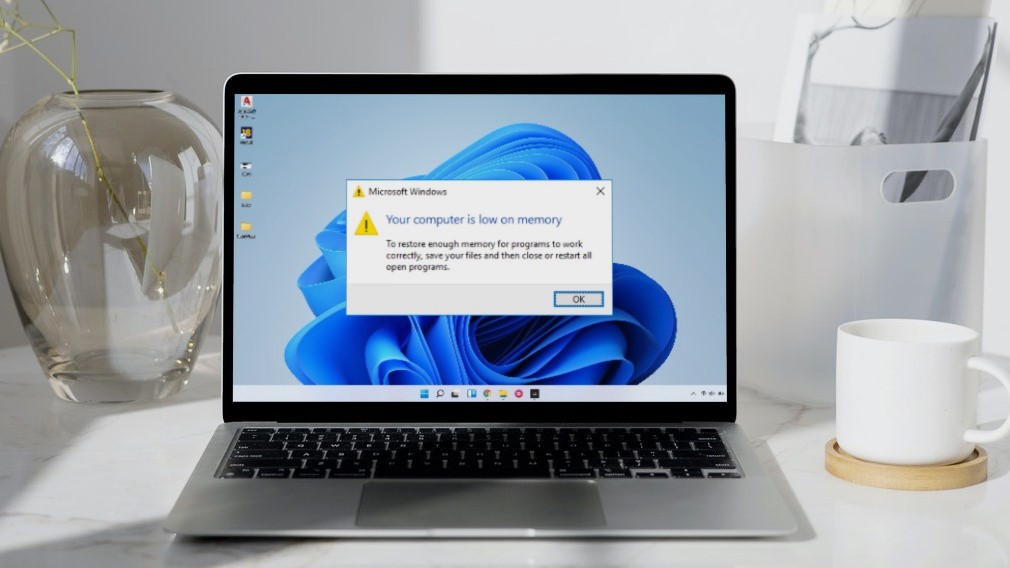
If the usual troubleshooting tips such as reloading the web page or restarting the browser haven’t worked, the problem could be with your audio drivers or Windows. Below, we share some useful solutions for fixing the YouTube audio renderer error on Windows. So, let’s get right to it.
1. Restart Your PC
You can start by doing what the error message says, which is to reboot your Windows PC. If the error is just a one-off glitch, restarting your PC should take care of it. Right-click on the Start icon, click on ‘Shut down and sign out,’ and select Restart from the sub-menu.
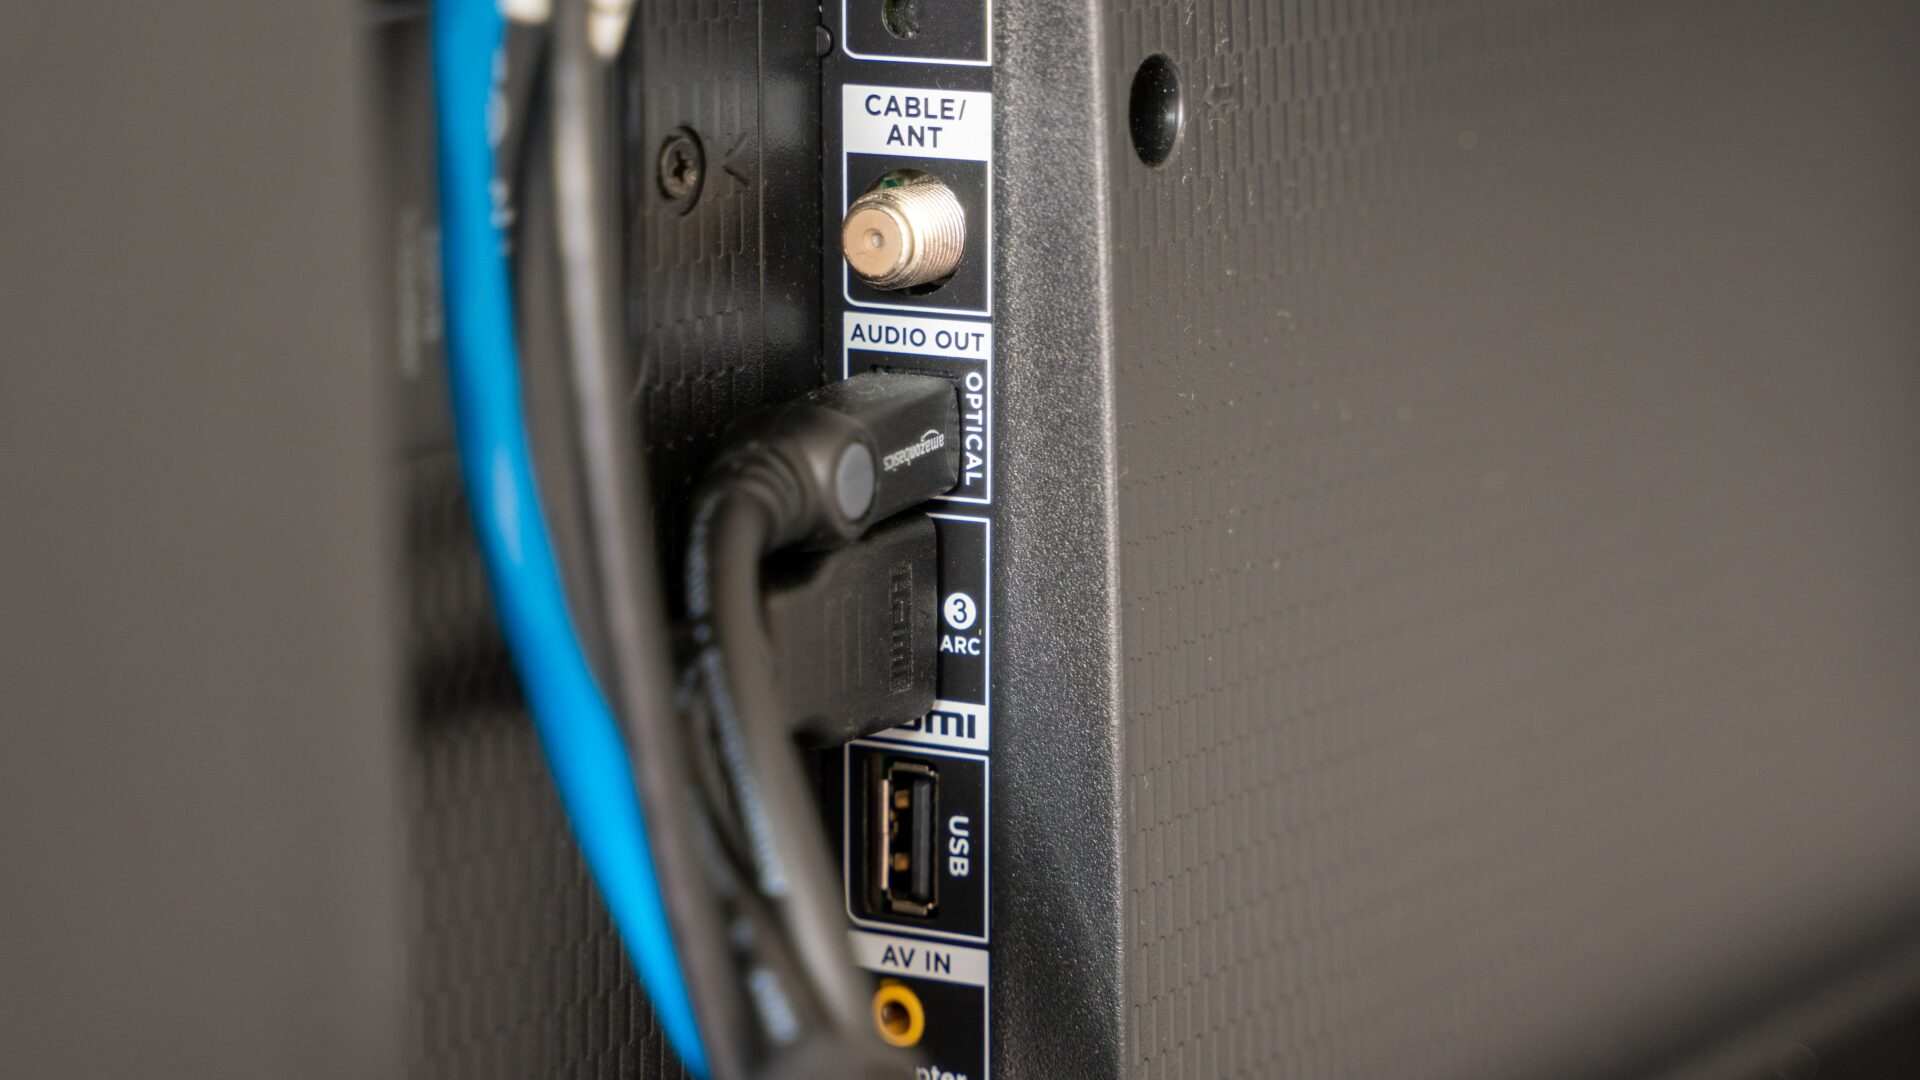
2. Disconnect and Reconnect Your Audio Output Device
Issues with your audio device can also trigger the audio renderer error on YouTube. If you’re using an external audio device, try disconnecting it and see if that resolves the error. If it does, you can plug your device back in.
3. Disable Audio Enhancements
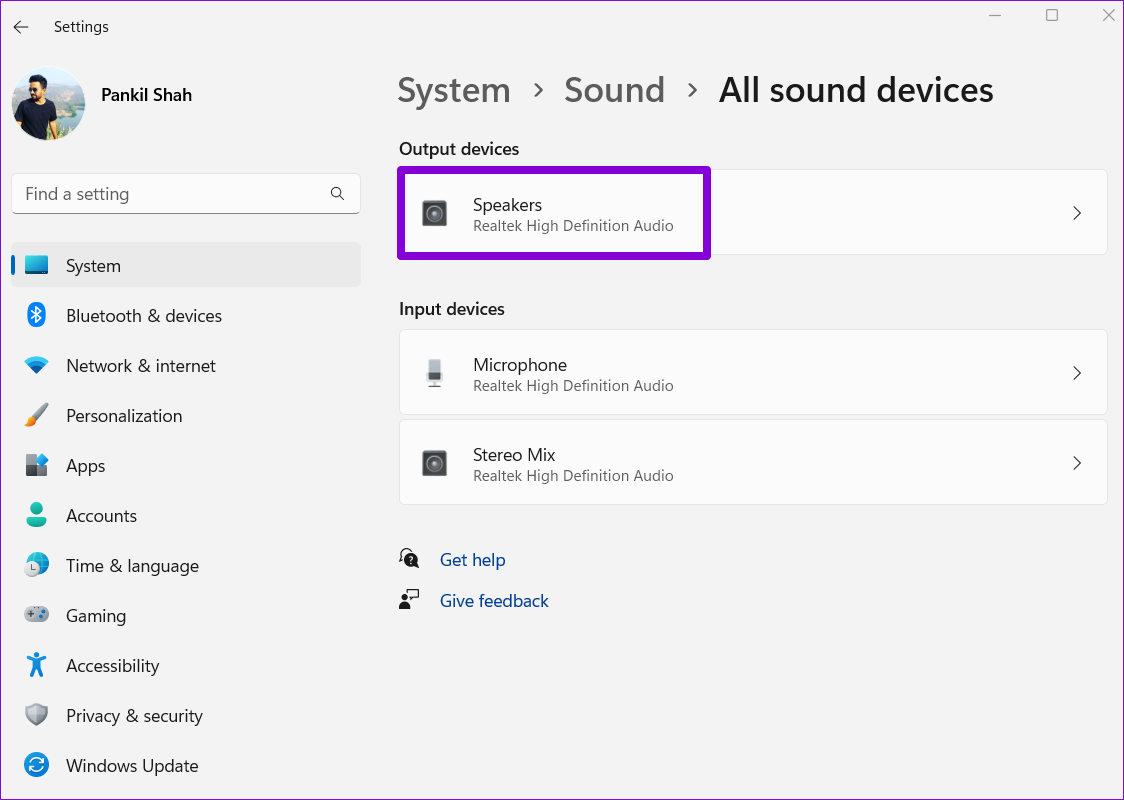
Both Windows 10 and Windows 11 include a number of audio enhancement options that can help improve the audio quality of your PC. However, when these audio enhancements fail to function as expected, it can lead to issues like the one described here. Hence, it’s best to disable them if you’re experiencing issues. Step 1: Press Windows key + I to launch the Settings app. In the System tab, click on Sound.
Step 2: Scroll down to the Advanced section and click on All sound devices.
Step 3: Select your output device.
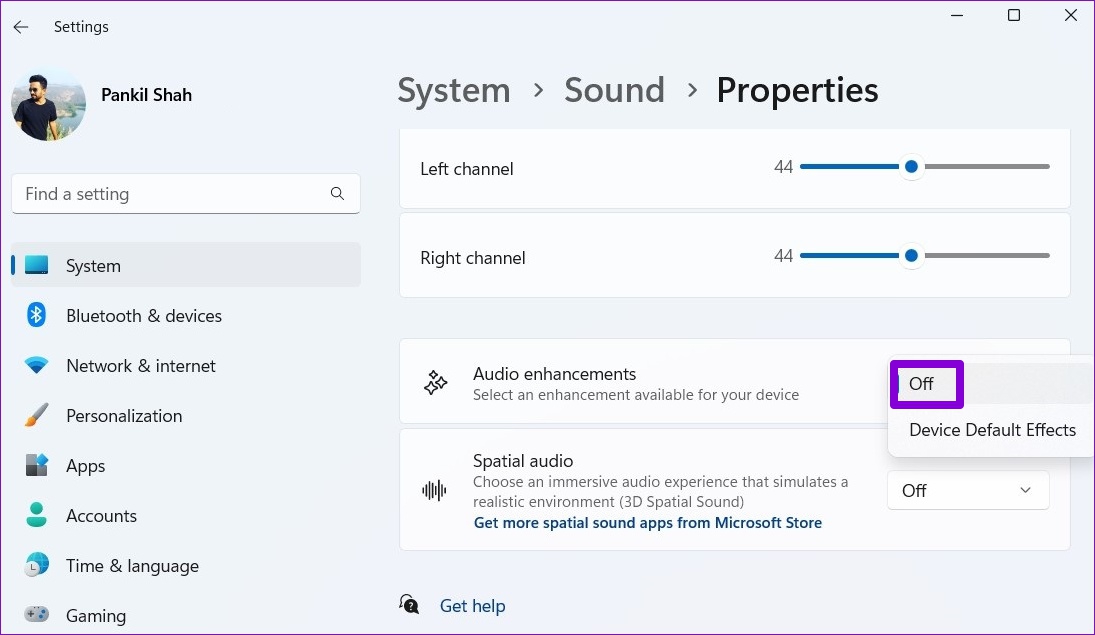
Step 4: Use the drop-down menu next to Audio enhancements and select Off.
4. Clear Browsing Data
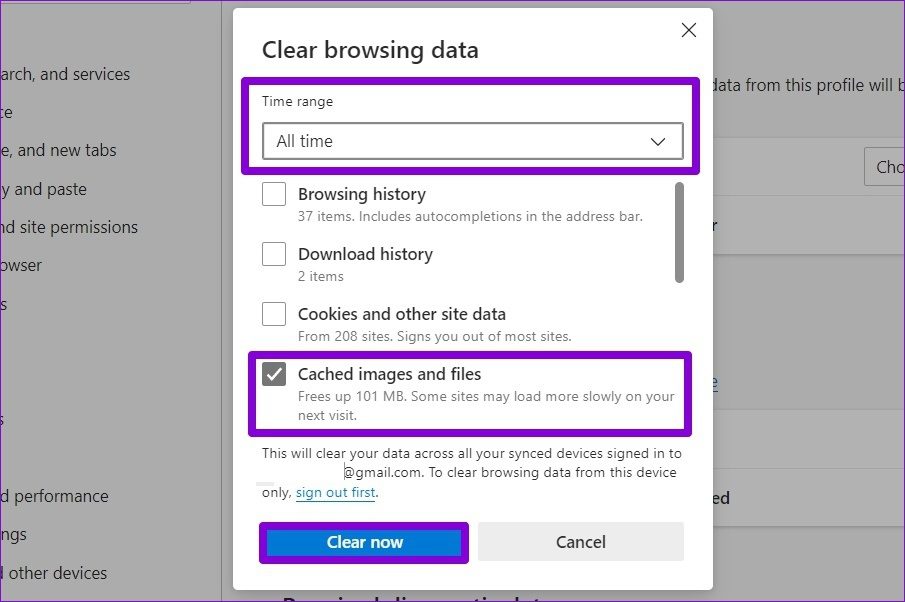
Outdated or corrupt cache data can also cause such YouTube playback errors. You can try clearing that cache data and see if that helps. To clear browsing data on Chrome, press Ctrl + Shift + Delete to open the Clear browsing data panel. Use the drop-down menu next to the Time range to select All time. Mark the checkbox that reads ‘Cached images and files’ and hit Clear data.
Likewise, if you’re using Edge, press Ctrl + Shift + Delete to open the Clear browsing data panel. Select All time and mark the box that reads ‘Cached images and files’. Then, hit Clear now.
5. Disable Hardware Acceleration
Issues with the hardware acceleration feature on your browser can also cause such errors in YouTube. To overrule this possibility, disable hardware acceleration in your browser and see if that helps.
Disable Hardware Acceleration on Chrome
Step 1: Launch Google Chrome on your PC. Click on the three-dot menu icon in the top-right corner and select Settings.
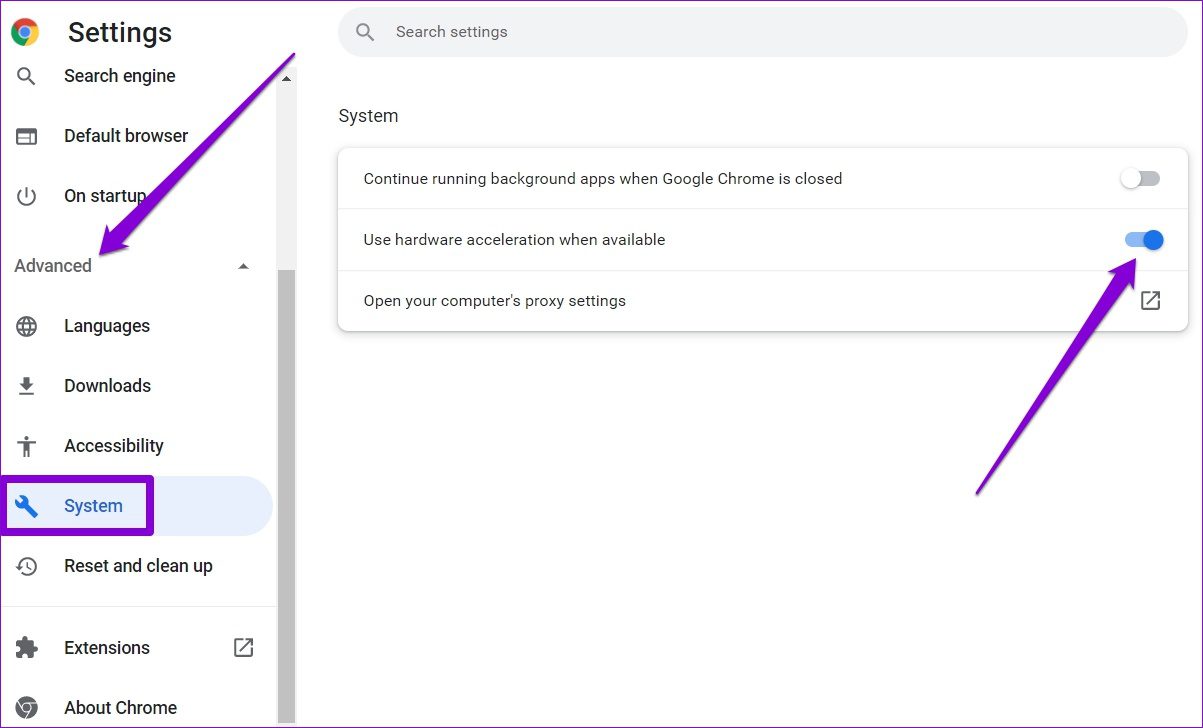
Step 2: Expand the Advanced section in the left pane and navigate to the System tab. Then, turn off the switch next to ‘Use hardware acceleration when available.’
Disable Hardware Acceleration on Edge
Step 1: In Microsoft Edge, click the three-dot menu icon in the top-right corner and select Settings.
Step 2: Head over to the System and performance tab and toggle off the switch next to ‘Use hardware acceleration when available.’
6. Run Audio Troubleshooter
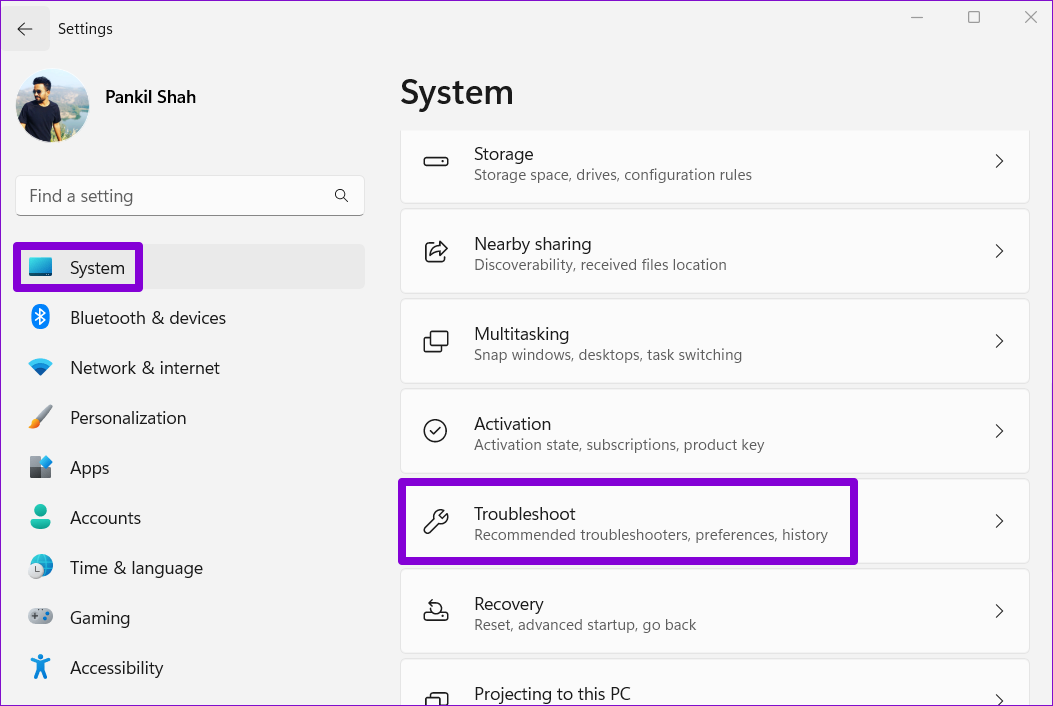
If the error persists, it’s possible that the problem is at the system level and has nothing to do with your browser. To fix this, take advantage of the built-in audio troubleshooter on Windows and allow it to detect and fix any audio issues for you. Step 1: Open the Start menu and click on the gear icon to launch the Settings app.
Step 2: Navigate to the System tab and select Troubleshoot.
Step 3: Go to Other troubleshooters.
Step 4: Click on the Run button next to Playing Audio to initiate the troubleshooting process.
7. Disable and Enable the Audio Device
If the troubleshooter fails to detect any issues, you can try disabling the audio device and enabling it again. Oddly enough, several users were able to get past YouTube’s audio renderer error by merely re-enabling the audio device. Step 1: Press the Windows key + X and select Device Manager from the list.
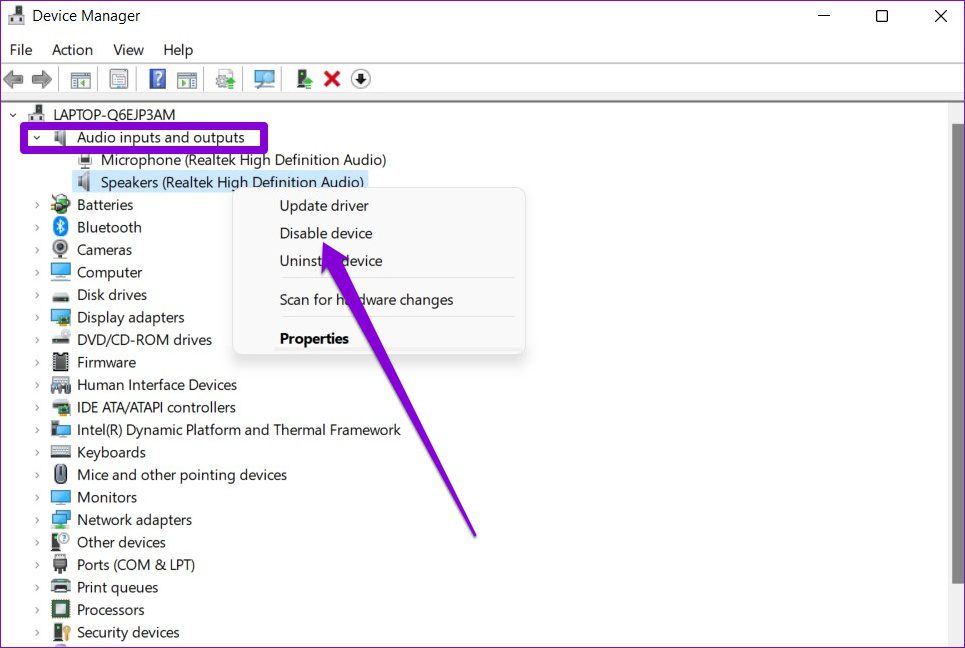
Step 2: Click the arrow before ‘Audio inputs and outputs’ to expand it. Then, right-click on your audio device and select Disable device.
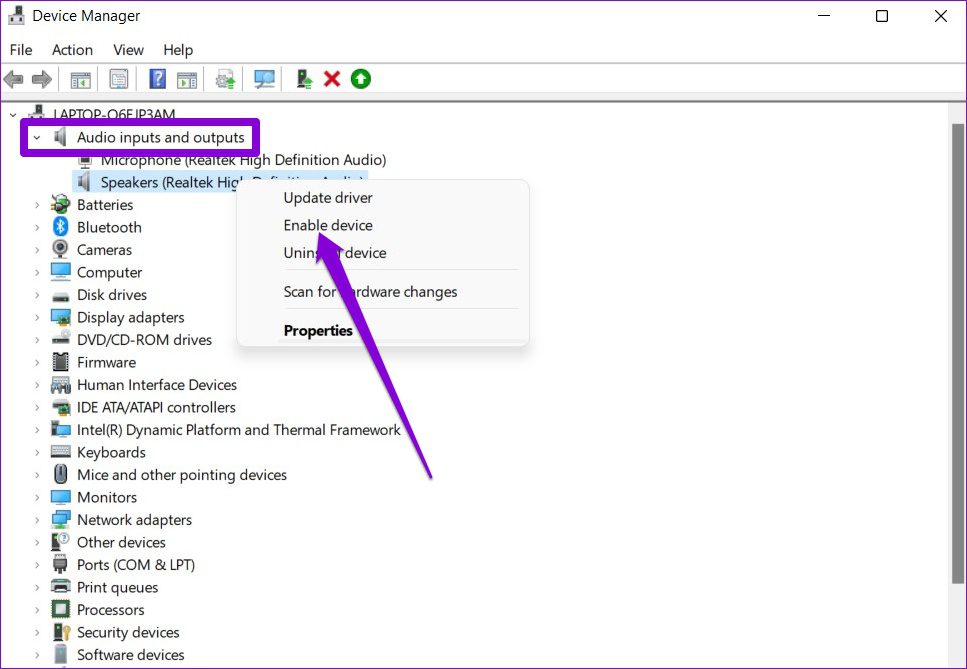
Step 3: Right-click on the same audio device and select Enable device.
8. Update or Reinstall Audio Drivers
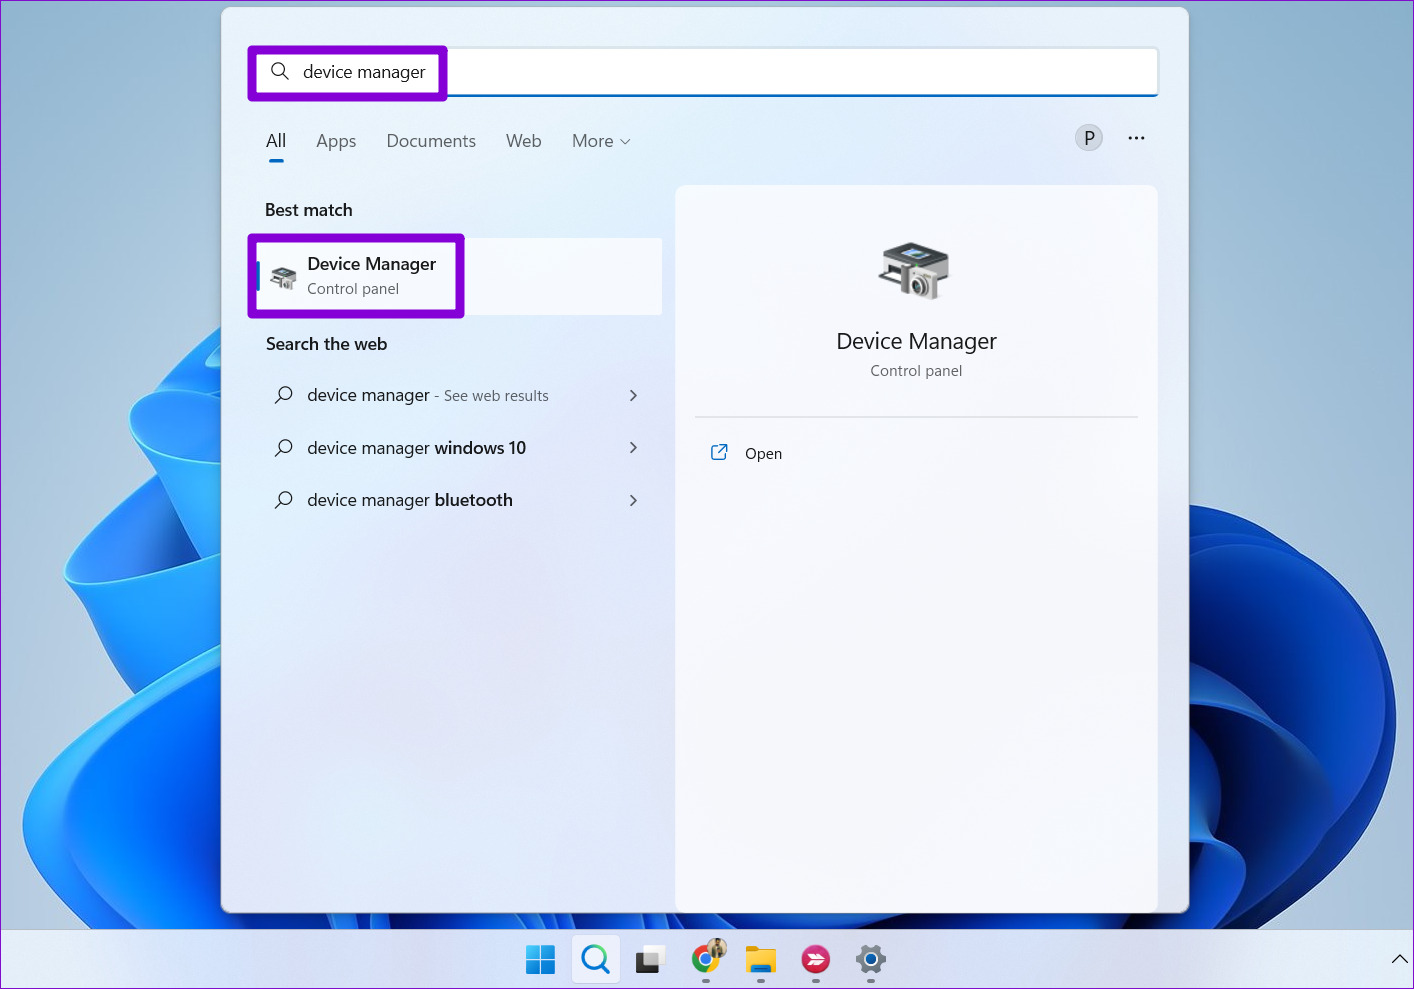
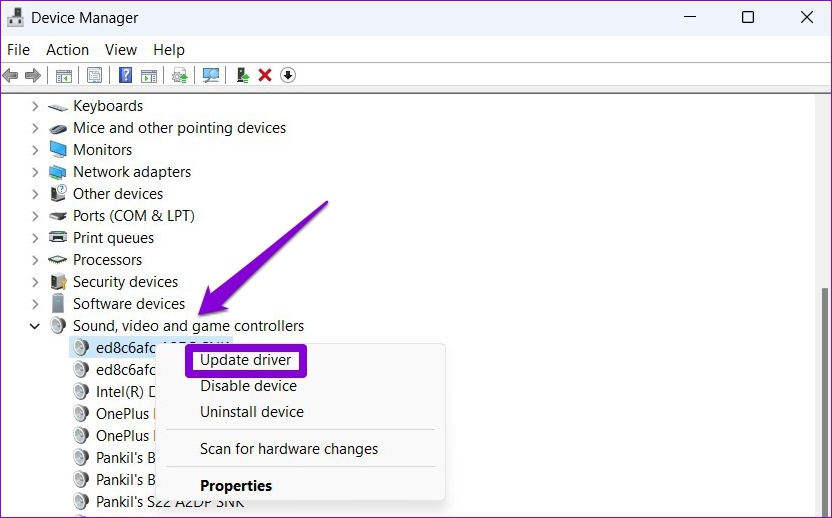
Problems with the audio drivers installed on your PC could cause the audio renderer error on YouTube. In most cases, you can fix such issues by updating the audio drivers. Here’s how you can go about it. Step 1: Press the Windows key + S to open Windows Search, type device manager, and press Enter.
Step 2: Click on the arrow before ‘Sound, video, and game controllers’ to expand that section. Right-click on your audio adapter and select Update driver.
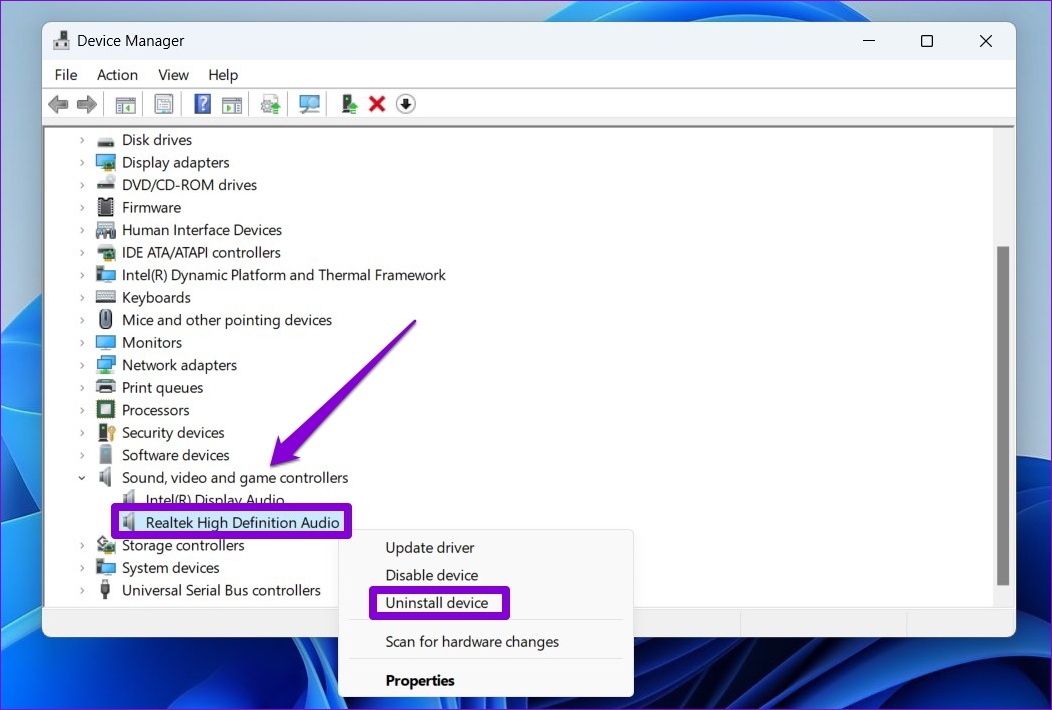
If updating the driver doesn’t work, follow the steps mentioned above to uninstall the audio driver. After that, restart your PC and let Windows install the removed audio drivers automatically.
9. Tweak Audio Playback Settings
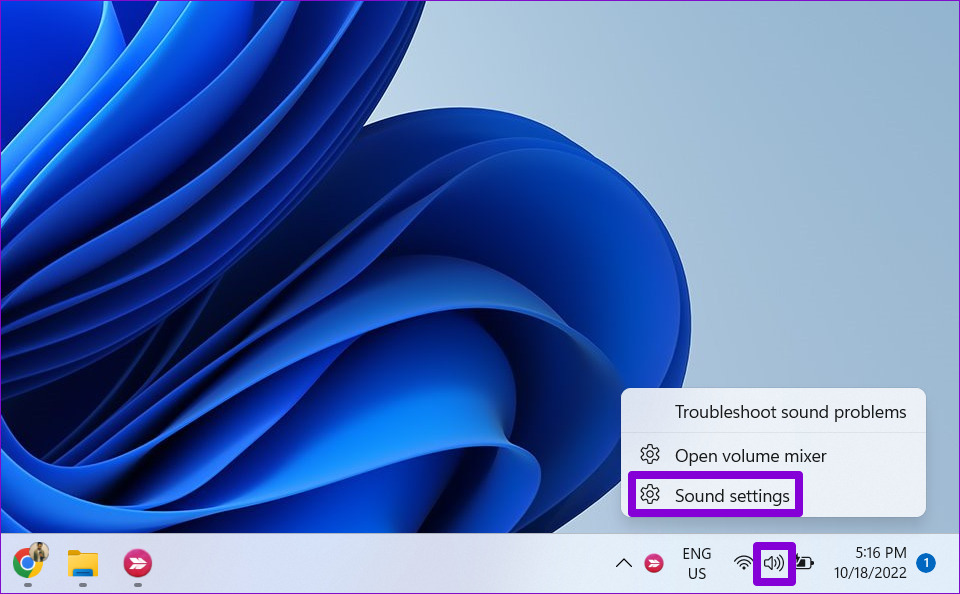
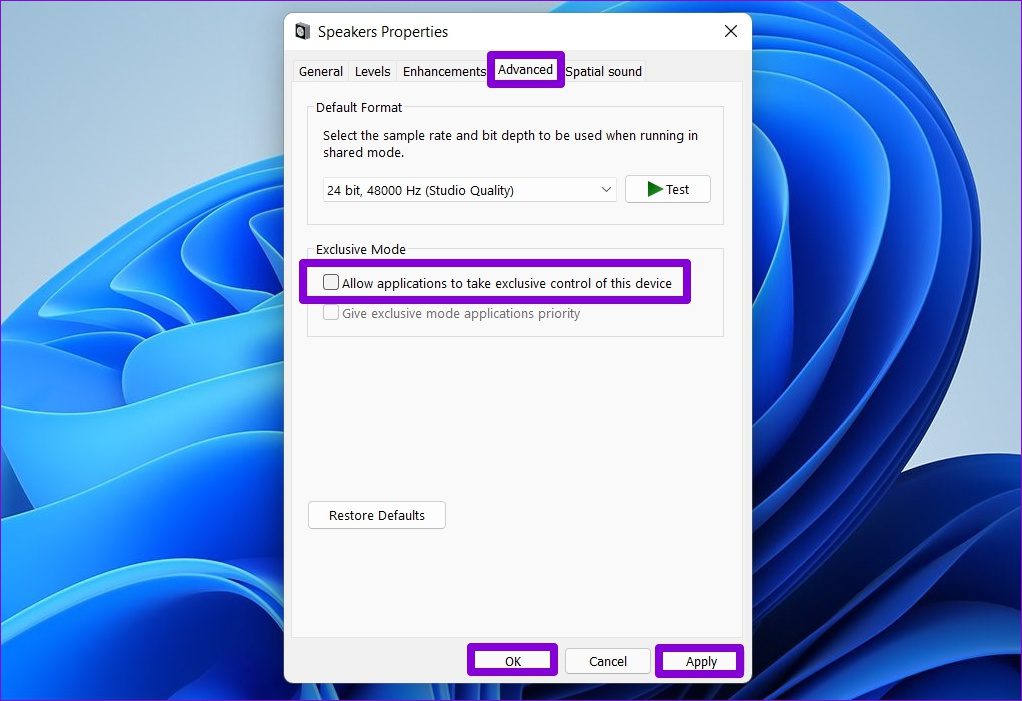
At times, third-party apps and programs on your PC can also interfere with your browsers and cause such problems. To avoid this, you must prevent apps from taking exclusive control of your audio device on Windows. Here’s how to do it. Step 1: Right-click on the speaker icon on the Taskbar and select Sound settings.
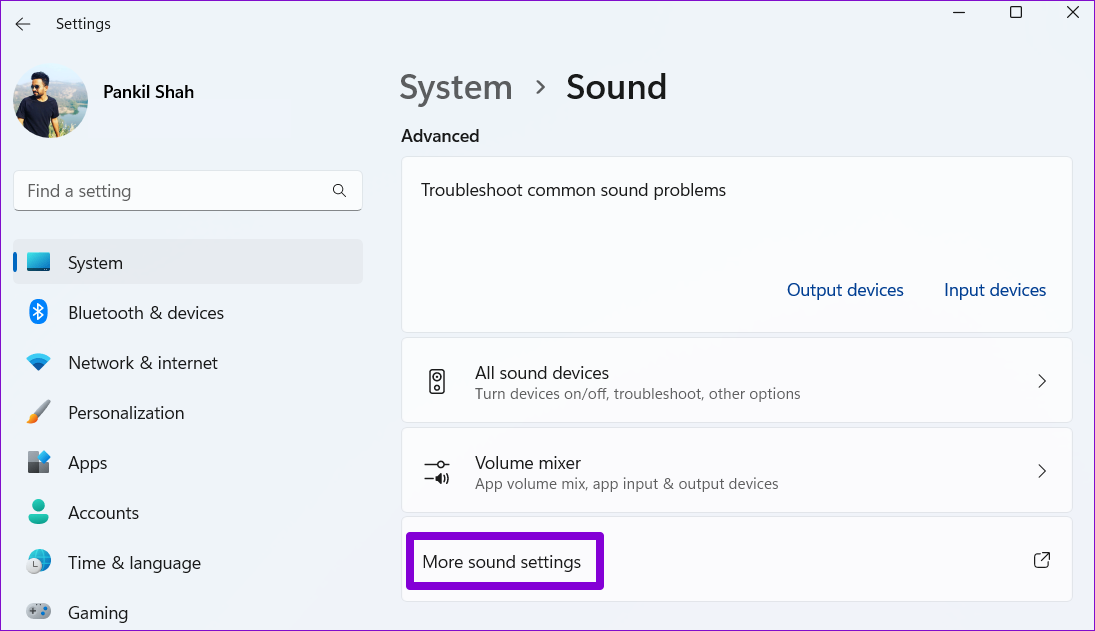
Step 2: Scroll down to the Advanced section and click on More sound settings.
Step 3: Right-click on your audio device and select Properties.
Step 4: Under the Advanced tab, uncheck the box that reads ‘Allow applications to take exclusive control of this device,’ and hit Apply followed by OK.
Restart your PC after this and try to play YouTube videos again.
Fixing Audio Woes
While such audio issues with YouTube are nothing new, the audio renderer error is limited to Windows. Hopefully, one of the above fixes has worked out and you’re back to enjoying YouTube videos. The above article may contain affiliate links which help support Guiding Tech. However, it does not affect our editorial integrity. The content remains unbiased and authentic.


