Microsoft Word offers three areas where users can personalize the app’s language. These areas include:
Display Language: It refers to the language for the user interface of the Word application. For example, the ribbons, menus, buttons, dialog boxes, and controls. Editing/Authoring Language: It refers to the language in which you write or edit text or content entered into the Word application. For this language option, users may need to download the associated keyboard as not all languages are pre-installed on Word. Proofing: It refers to the language in which grammar and spell checks are conducted. This can be set the same as the editing language.
You can set the display and edit language of your Microsoft Word app differently from each other. That is, you can have the display language of your Word app in English and at the same time have the editing language in Italian. Here’s how to do so:
How to Change the Display and Editing Language in the Microsoft Word App
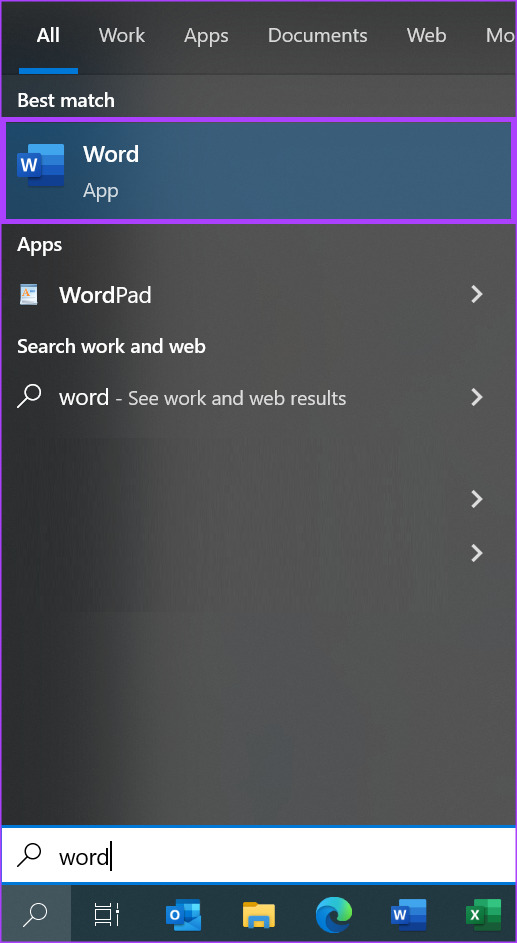
Changing the display or editing language in Microsoft Word requires updating your set language preferences. Here’s how to do so: Step 1: Click the Start button on the Taskbar and type word to search for the app.
Step 2: From the results, click on the Microsoft Word app to open it.
Step 3: On the Word Ribbon, click on the File tab at the top-left corner.
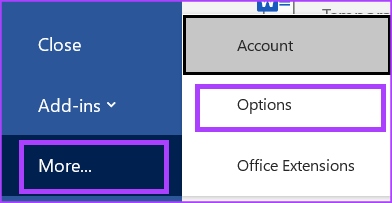
Step 4: Scroll to the bottom of the File menu and click on More or Options to reveal a collapsed menu.
Step 5: Click Options from the menu.
Step 6: From the Word Options pop-up window, click Language from the left sidebar.
Step 7: In the Office display language section, click on ‘Install additional display languages from Office.com’ if your language isn’t displayed.
Step 8: From the ‘install a display language’ pop-up, select the language you want to install and click Install.
Microsoft Word may need to relaunch, or you may need to restart your computer to complete the new language installation process. Step 9: After installing the new language, click the ‘Set as Preferred’ button to make it your default display language.
Step 10: In the Office authoring languages and proofing section, click on ‘Install additional keyboards from Windows Settings’ or ‘Add a Language’ if your preferred language isn’t displayed. This should launch the Windows Language Settings window.
Step 11: From the Language Settings window, click Add a Language.
Step 12: From the ‘Choose a language to install’ pop-up, select the language you want to install and click Next to install the language pack.
Step 13: After installing the new language, click the ‘Set as Preferred’ button to make it your default proofing language.
Step 14: Click OK to save your changes.
How to Change the Editing Language on Microsoft Word for Web
When using Word for the web, you can only change the editing/proofing language. Here’s how to do so: Step 1: Click on the Word icon to launch the app and sign in to your Microsoft 365 account. Login to Microsoft 365 Step 2: On the Word Ribbon, click on the Review tab.
Step 3: From the Review tab, click on the Editor icon.
Step 4: From the Editor drop-down, click Set Proofing Language to launch a pop-up.
Step 5: On the proofing language pop-up, select whether to change proofing language for:
Selected text Current Document
Step 6: Scroll through the language options for your preferred proofing language.
Step 7: Click OK to save your changes.
What Is the Keyboard Shortcut to Change the Language in Microsoft Word
Microsoft Word currently does not offer a shortcut to change the language. However, if you are trying to access your language settings quickly, you can do so in one click. Click the Language option at the bottom of the status bar on the Word page. Doing so will launch the proofing language setting of your Word document. From here, you can set your proofing language preferences.
Creating a Custom Dictionary in Microsoft Word
As you change the editing language on your Word app, it is important to note that Word conducts proofing using the relevant language’s dictionary. Therefore, to ensure the content of your Word document do not end up flagged as errors, you can create your custom dictionary. The above article may contain affiliate links which help support Guiding Tech. However, it does not affect our editorial integrity. The content remains unbiased and authentic.

