For example, the Heading 1 Style in Microsoft Word might make the selected text bold, in Arial Font and a size 16. The Style setting in Microsoft Word may depend on your Word app’s default settings or your personalization. If you do not want to worry about selecting the Style for your Word document, you can import from another document. The Organizer feature in the Developer tab of the Word Ribbon is one of the ways to import styles.
How to Access the Developer Tab in Microsoft Word
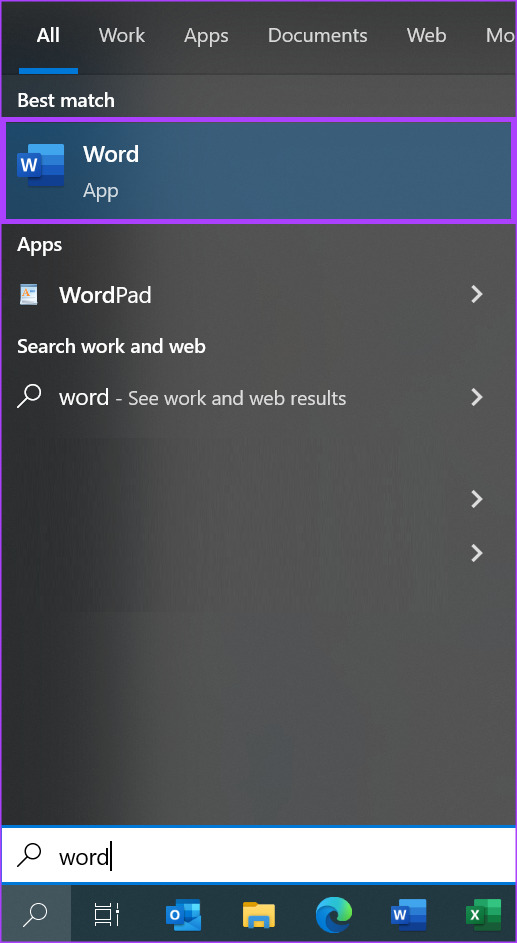
The Developer tab in Microsoft Word has the Organizer feature, which you can use to import styles. However, your Word app may not show the Developer tab by default. Here’s what you need do to bring it on the Ribbon: Step 1: Click the Start button on the Taskbar and type word to search for the app.
Step 2: From the results, click on the Microsoft Word app or document to open it.
Step 3: On the Microsoft Word Ribbon, click on the File tab.
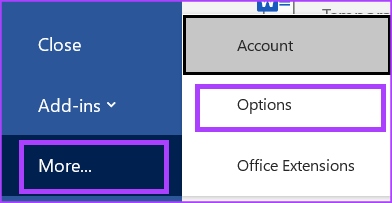
Step 4: Scroll to the bottom of the File menu and click on More or Options to reveal a collapsed menu.
Step 5: Click Options from the menu.
Step 6: From the Word Options pop-up window, click Customize Ribbon from the left sidebar.
Step 7: Scroll through the options in the Customize the Ribbon table and select the tick box beside Developer.
Step 8: Click OK to save your changes. The Developer tab will show up on your Ribbon.
How to Access the Organizer Dialog Box
With the Developer tab visible on your Ribbon, you can access the Organizer dialog box to import Styles. Here’s how to do so: Step 1: On the Word Ribbon, click the Developer tab.
Step 2: Within the Templates group, click Document Templates. This will launch the Templates and Add-ins dialog box.
Step 3: From the Templates and Add-ins dialog box, click the Organizer button on the bottom left. This will launch the Organizer dialog box.
How to Import Styles Using the Organizer Dialog Box
You’ll get two split boxes when you open the Organizer dialog box. The left box will have the document you want to import styles into. On the right side, you will need to open the document with the styles you want copied. Here’s how to import styles from one Word document to another. Step 1: On the Organizer dialog box, move your cursor to the right side classified as ‘In Normal.dotm:’
Step 2: Click the Close File button under the ‘In Normal.dotm:’ group.
Step 3: Click the Open File button under the ‘In Normal.dotm:’ group.
Step 4: From the File Library, navigate to the location of the file you wish to import styles from. Step 5: At the bottom right of the File Library dialog box, click the File Type drop-down menu and select All Files. This is important as by default the file library may only show documents saved as templates. So, to view all file formats, selecting All Files in File Type is important.
Step 6: Select the File with the styles you want to import and click Open. The right side of the Organizer will now have the Document name and features shown under it. Step 7: Under the file’s name, scroll through the features of the document shown and click on the Style you would like to copy. You can also select multiple styles by holding down the Ctrl button on your keyboard. A footnote at the bottom of the Organizer dialog box will provide a description of the feature selected.
Step 8: Click the Copy button to import the selected style to your document.
Step 9: After selecting the styles to import, click Close at the bottom of the dialog box.
Creating a Custom Color Set in Microsoft Word
In Microsoft Word, apart from using personalized Styles, you can also use custom color sets. If the default color sets in Microsoft Word do not work for you, you can also create yours and save it for future use. The above article may contain affiliate links which help support Guiding Tech. However, it does not affect our editorial integrity. The content remains unbiased and authentic.


