You may not want to sync important files and media to OneDrive or share location with Microsoft on Windows 11. You can use the steps below to remove your Microsoft account from Windows 11.
Should You Remove Your Microsoft Account From Windows 11
Firstly, we don’t recommend removing a Microsoft account entirely from a Windows 11 PC. It’s an essential part of the Windows 11 experience. An active Microsoft account lets you download apps and games from the Microsoft Store, upload media and documents to OneDrive, and sync your settings across all Windows devices. However, if you don’t want to share you data with Microsoft, you can remove your Microsoft account from Windows 11. It’s also a good idea when you land your laptop to a friend for a few days. You can prevent the person from peeking at your private OneDrive files and other apps on your computer. Whatever the reason, here are the ways to remove a Microsoft account from Windows 11.
Create a Local Account on Windows 11
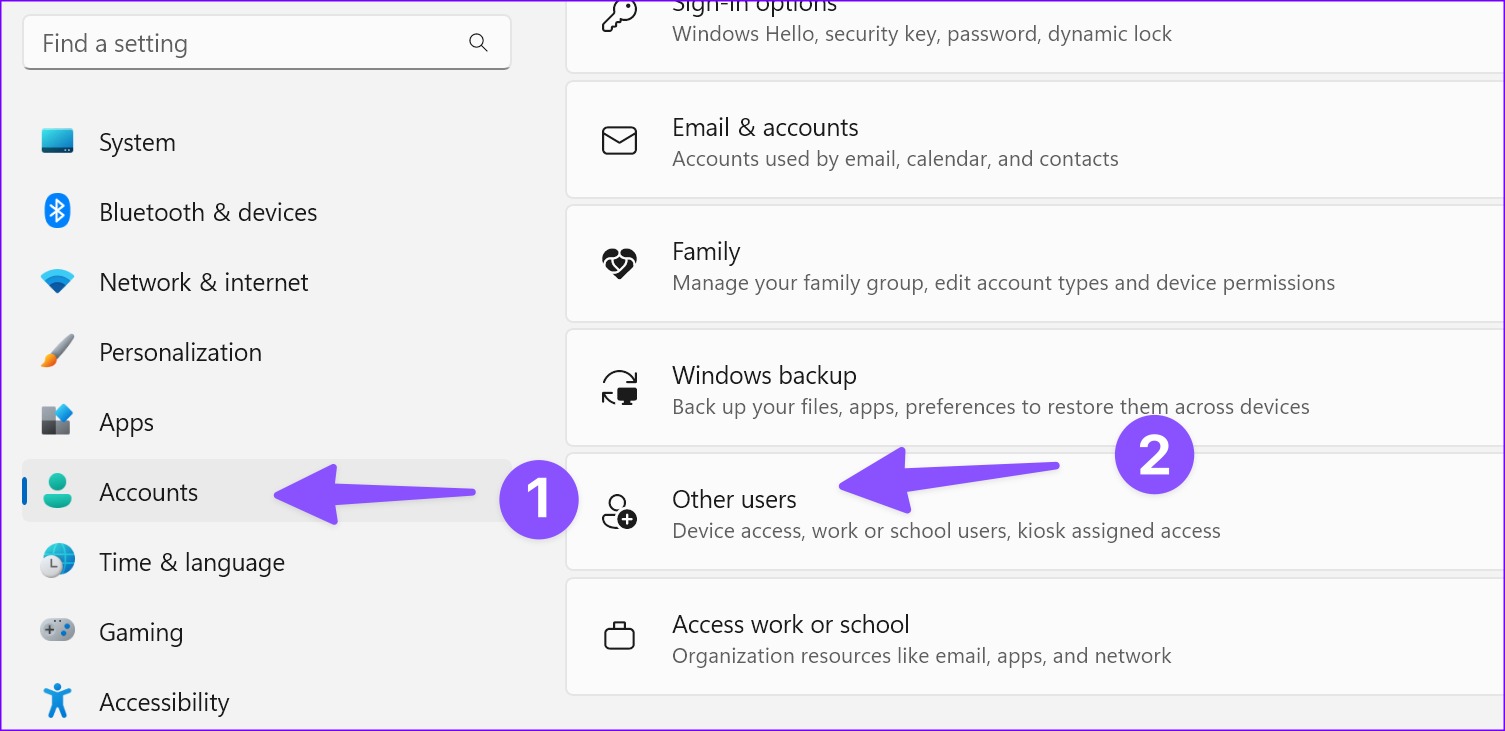
Before you remove a Microsoft account from Windows 11, you should first add a local account on your PC. Follow the steps below. Step 1: Press Windows + I keys to open the Settings app. Step 2: Select ‘Accounts’ from the left sidebar and click ‘Other users’ in the right pane.
Step 3: Select ‘Add account.’
Step 4: Click ‘I don’t have this person’s sign-in information.’
Step 5: Select ‘Add a user without a Microsoft account.’
Step 6: Enter the user name and password and hit Next to complete the setup.
To remove your Microsoft account, you must give administrative privileges to the local account. Windows 11 creates a new local account with Standard permissions. Go through the steps below. Step 1: Open Accounts in Windows 11 Settings (refer to the steps above). Step 2: Select ‘Other Users.’ Step 3: Click the down arrow beside your local account.
Step 4: Select ‘Change account type.’
Step 5: Expand the Account type menu and select Administrator.
Sign out from your current Microsoft account and sign back in using your local account.
Remove Your Microsoft Account from Windows 11
After you set up a local account with admin privileges, you can remove all the connected Microsoft accounts from your Windows 11 PC. Here’s how. Step 1: Launch Windows 11 Settings menu by pressing Windows + I keys. Step 2: Check your local account from the top-left corner. Step 3: Go to Accounts and select Other users.
Step 4: Check your connected Microsoft account. Step 5: Expand it and select Remove.
Deleting the account will remove all the data from this PC, including items on the desktop, downloads, photos, music, and other files. Make sure to take a backup important files to OneDrive or Google Drive. Step 6: Select ‘Delete account and data’ to confirm your decision. Your Microsoft account will no longer appear on the sign-in screen. You will only see your local account.
Remove Your Microsoft Account Using Control Center
While Microsoft has done a decent job importing Control Center options to the redesigned Settings menu in Windows 11, some still prefer the former to make changes to their PC. If you are among them, read along to learn to remove a Microsoft account using the Control Center. Step 1: Press the Windows key and search for Control Center. Step 2: Hit Enter to open the app.
Step 3: Select ‘User Accounts.’
Step 4: Select ‘Remove user accounts.’
Step 5: Click on your Microsoft account.
Step 6: Select ‘Delete the account.’
Windows offers an option to keep your local files. The system can automatically save the contents of your desktop and Documents, Favorites, Music, Pictures, and Videos folders to a new folder on your desktop.
Stay Local and Private
Your local account on Windows 11 has several restrictions without any presence of your Microsoft account. Since you can’t download apps from the Microsoft Store, you need to install apps from the web. You’ll need to rely on web apps to upload files and create documents too. Make sure you understand the limitations of a local account before removing your Microsoft account from Windows 11. The above article may contain affiliate links which help support Guiding Tech. However, it does not affect our editorial integrity. The content remains unbiased and authentic.

