To solve this issue, Apple has rolled out a new feature for iPhone, iPad, and Mac users that lets them automatically dim flashing lights when such videos start playing. We will show you how to turn on this feature on different Apple devices.
Dim Flashing Lights on iPhone and iPad
Today, mobile devices are mostly the primary source for the content consumption. So let us first show you how to automatically dim flashing lights while watching videos on your iPhone and iPad. Do note that this feature was introduced with iOS 16.4 and iPadOS 16.4. So before moving ahead with the steps, we suggest updating the software version of your device. The steps remain the same for iPhone and iPad. Step 1: Open the Settings app on your iPhone or iPad.
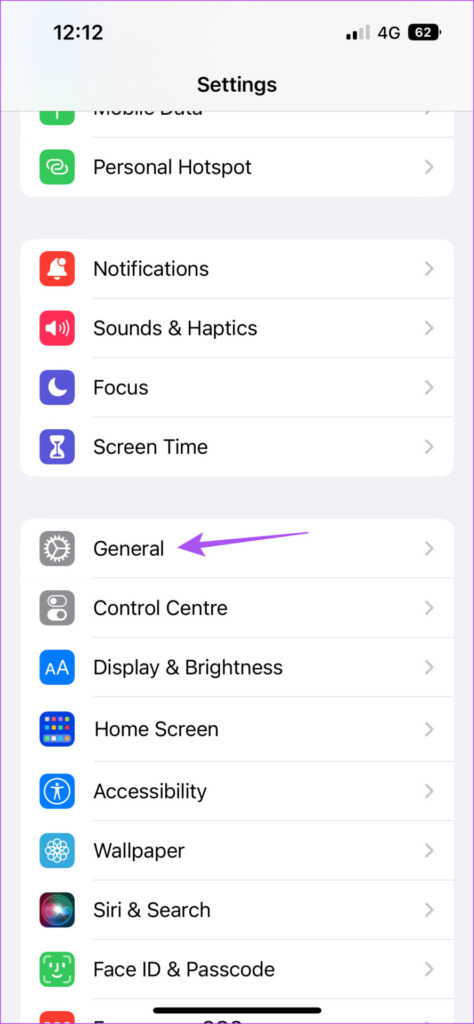
Step 2: Scroll down a bit and tap on General.
Step 3: Tap on Software Update.
Step 4: If an update is available, download and install it. Once the installation is complete, here’s how you can enable Dim Flashing Lights on your iPhone or iPad. The steps remain the same for both platforms. Step 1: Open the Settings app on your iPhone or iPad.
Step 2: Scroll down and tap on Accessibility.
Step 3: Tap on Motion from the list of options.
Step 4: Tap the toggle next to Dim Flashing Lights.
Along with using this feature during video playback, you can also set app limits on your iPhone and iPad to prevent excessive media consumption.
Dim Flashing Lights on Mac
If you consume most of the videos from your Mac, you can enable the feature to dim flashing lights in videos automatically. Note that your Mac should be running on macOS Monterey 13.3 or above to use this feature. Here’s how to check and install the same. Step 1: Press Command + Spacebar keyboard shortcut to open Spotlight Search, type System Settings, and press Return.
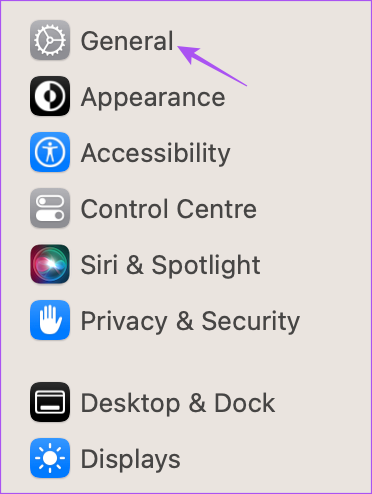
Step 2: Click on General from the left menu.
Step 3: Click on Software Update.
Step 4: If an update is available, download and install it on your Mac. Once the installation is complete, here’s how you can dim flashing lights while watching videos on your Mac. Step 1: Press Command + Spacebar keyboard shortcut to open Spotlight Search, type System Settings, and press Return.
Step 2: Scroll down and click on Accessibility from the left sidebar.
Step 3: Select Display from the list of options.
Step 4: Click the toggle next to Dim Flashing Lights to turn it on.
After you start playing a video, your screen will start dimming automatically. Watching video content that includes the strobe light effects is not advised, especially for kids. You can use the Screen Time feature on Mac to monitor and limit content consumption.
Dim Flashing Lights on Apple TV
Apple also introduced this feature for Apple TV users. If you are a movie buff, you must have come across films like Enter The Void, which features heavy strobe light effects (that’s just Gaspar Noé for you). So if you want to reduce the strobe lighting effects, you can turn on the feature on your Apple TV. Before that, ensure that you are using tvOS 16.4 or above. Step 1: Open Settings on your Apple TV.
Step 2: Scroll down and select System.
Step 3: Select Software Updates.
Step 4: Select Update Software.
Step 5: If an update is available, download and install it. After the installation is complete, here’s how you can automatically dim flashing lights in videos on your Apple TV or Apple TV 4K. Step 1: Open Settings on your Apple TV.
Step 2: Scroll down and select Accessibility.
Step 3: Select Motion from the list of options.
Step 4: Select Dim Flashing Lights to enable the feature.
Save Your Eyes
This is a great step from Apple to include the option to automatically dim flashing lights on different devices. There are a lot more accessibility features for those suffering from vision impairments. For example, you can invert the screen or picture colors on your iPhone to avoid the harmful effects of extended device usage. We recommend to balance your device screen time during your daily usage. The above article may contain affiliate links which help support Guiding Tech. However, it does not affect our editorial integrity. The content remains unbiased and authentic.


